The EPoS is designed to work alongside a Hardware integration. For more information on that, click [here](https://bookstack.iconography.co.uk/books/hardware-device-setup/chapter/star-printers "Hardware").
### Order ManagementThis is the default view.
Within the POS, users can: - create and search for Sales Orders - create and search for Customers - search for products - navigate categories - view stock levels - view item upsells ### Voucher Balance This section may be used to review voucher balance. ### Performance Report Within this section, users can review their daily and weekly performance against targets set in [Site Settings](https://bookstack.iconography.co.uk/books/site-settings "Site Settings"). ### End of Day This section may be used to record end of day takings; it is an essential part of the cashing up process. # Adding a New Sales Order in the EPoS # Adding a Customer to a Sales Order in the EPoS When raising an order in the EPoS, you can choose to add a new customer by entering their details manually, or you can search for an existing customer that is already registered with you. ### New Customer You can enter new customer details to a new order in the EPoS by simply clicking "Add Customer". Once you have done this you will be able to add the following details; - Title, first name and surname. - Address, postcode and country. - "Where did you hear about us?" - Contact details including Email address, telephone number and alternate telephone number. Contact preferences for the customer can be updated using the "Contact Preferences" button under the email address. [](https://bookstack.iconography.co.uk/uploads/images/gallery/2025-05/contact-preferences.jpg) Within the contact preferences you can select which public and private mailing groups to add them to (these will be pulled from the [Manage Groups](https://bookstack.iconography.co.uk/books/groups) screen. [](https://bookstack.iconography.co.uk/uploads/images/gallery/2025-05/WjRcontact-preferences-popup.jpg) Once you are happy that the details have been entered correctly, click "Update". ### Existing Customer 1\. Click "Create New Order" 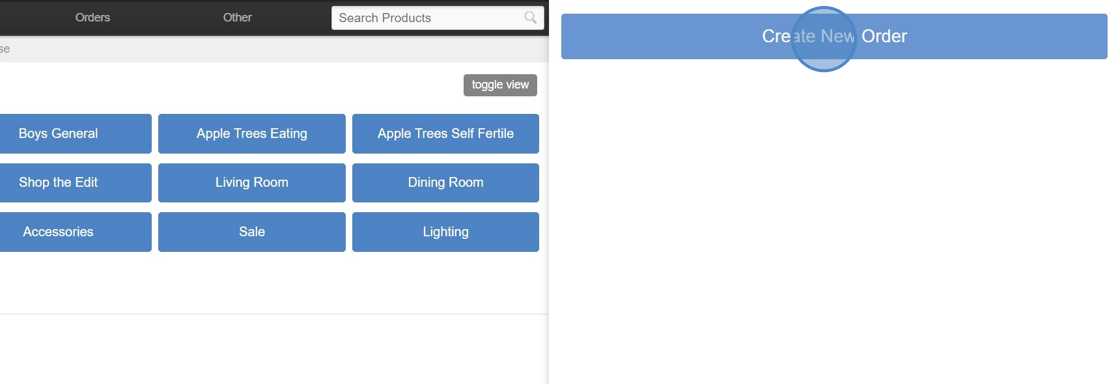 2\. Click "Add Customer"  3\. You can search for an existing customer using their surname, postcode, email or loyalty code.  4\. Click search to return matching results.  5\. Click "add" when you have found the appropriate customer.  6\. The customer, along with all of their contact details, has been added to the order successfully.  7\. You can choose to amend or add missing details manually if required.  # Adding a Product to a Sales Order in the EPoS There are three methods of searching for, and ultimately adding, products to an order in the EPoS; 1. Search field. 2. Browse Products. 3. Barcode scanners. #### Search Field You can easily search for a product by entering an appropriate term or SKU in to the "Search Products" field. This will return suggested results as you type, or you can hit return to see all of the results. [](https://bookstack.iconography.co.uk/uploads/images/gallery/2025-05/eA1product-search-field.jpg) #### Browse Products Under "Browse Products" you will be able to browse through your categories (listed in blue boxes), just as a customer would on the front end of your site. From here you can enter the appropriate categories and sub-categories to find the appropriate product that the customer wishes to purchase. You can browse through categories by hovering over "Browse" in the EPoS navigation bar at the top. This is essentially the same as browsing using the blue category boxes. #### Barcode Scanners If you have barcode scanners, these will allow you to scan the product that the customer wishes to purchase, which will automatically add the product to the order, without having to search for it.Scanning a product will add a new line if one doesn't exist, or change the quantity of a line if that product is already part of the Sales Order
To add the same product on a new line, you will need to manually add it to the order via the 'add/order' button
### Adding a ProductAdding a product manually (by clicking the button in the POS screen) will always add a new sales order line, even if that line already exists on the Sales Order.
1\. Choose the category you wish to search in.  2\. Choose the sub-category you wish to search in.  3\. You may wish to search within further sub-categories, or you can simply add click "ADD" on a product within the chosen category.  4\. From here you will be able to select the from the available variants, as well as any Unique Stock Records (USR) that are currently available from stock.  5\. Selecting a variant will allow you to proceed to choose from the available options.  6\. The final step will be to add any custom options. If no custom options are required, click "add".  7\. The product has now been successfully added to the order.  Product availability is detailed within the EPoS. For a full explanation of this terminology, please click [here](https://bookstack.iconography.co.uk/books/general/page/stock-terminology "Terminology - Stock"). [](https://bookstack.iconography.co.uk/uploads/images/gallery/2025-05/image.png) # Adding Add Ons to a Sales Order in the EPoS If a product has addons assigned to it within the CMS, these can be selected as part of the ordering process within the EPOS. 1\. Click "ADD" on the appropriate product when in an order in the EPoS.  2\. If there are multiple variants available you will see a popup where you can select the appropriate variant.  3\. If the product has addons set up, these will be listed as the next step in the popup.  Tip: If ordering a standard product, addons are chosen in the next step. If ordering a made to order product, the addon will be one of the final steps after selecting made to order options. 4\. Clicking the drop-down arrow will present all available addons, as they have been set up in the CMS. 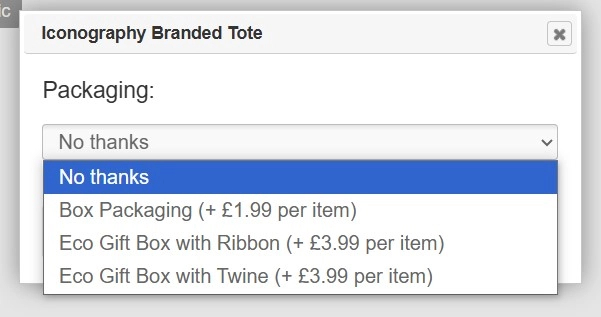 5\. After selecting the appropriate addon, you will be presented with the addon description, as set up in the CMS. Click "Continue" to add the product and addon to the order.  6\. Both the product and addon have now been added to the order.  7\. The addon can be amended by using this button. [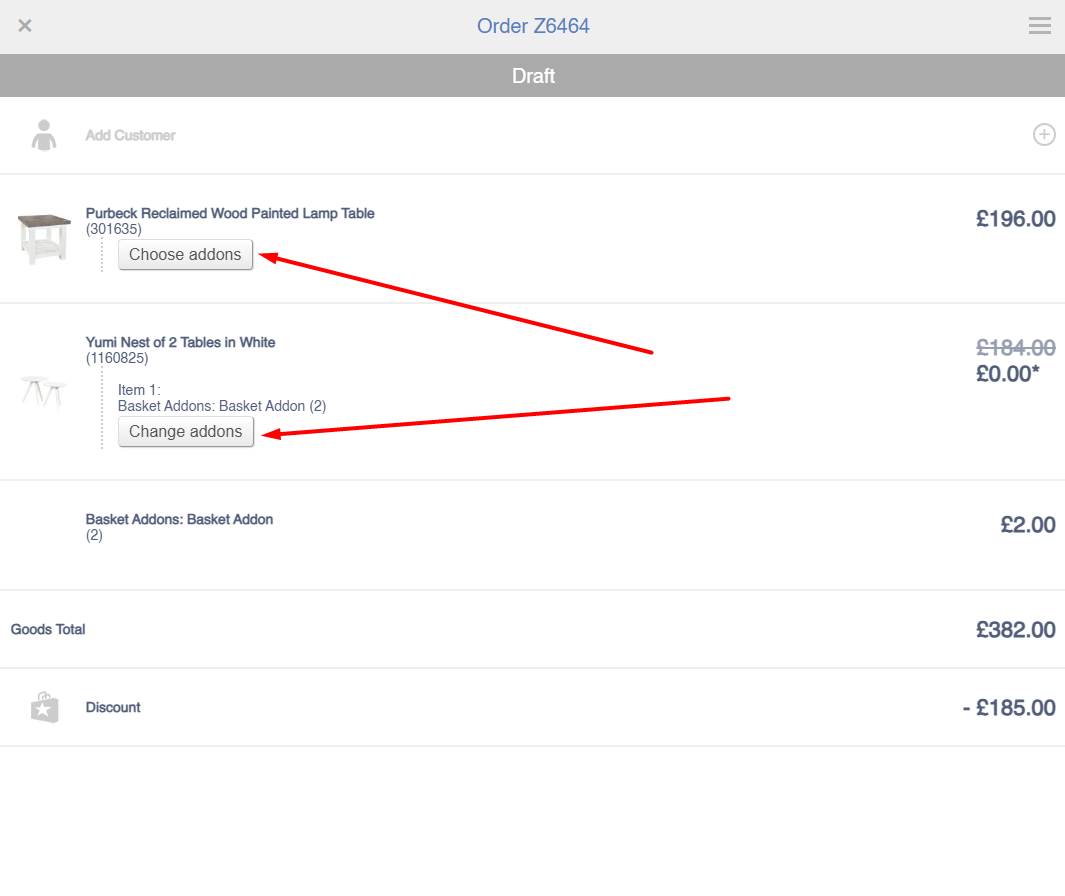](https://bookstack.iconography.co.uk/uploads/images/gallery/2025-10/llTimage.png) # Adding Upsells to a Sales Order in the EPoS [](https://bookstack.iconography.co.uk/uploads/images/gallery/2025-05/m9Nimage.png) # Adding a Discount to a Sales Order in the EPoS 1\. Once a product has been added to an order, a discount can be added by clicking "Apply Discount".  2\. There are two discount options available; promo code (if there is one available from your promotions) and custom discount.  3\. If adding a custom discount, a reason must be entered. You can choose from Staff Discount, Goodwill, Damaged or Other. 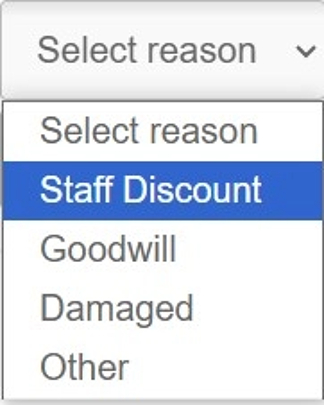 4\. You can also select if you would like to apply the discount from the overall goods total, or from a specific product on the order. In this instance, we're going to apply a discount to the whole order. 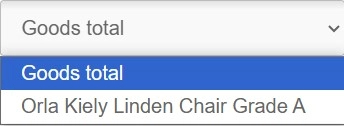 5\. The next step is to choose the method of discount. You can discount be a specific amount, by a percentage or set to a specific price. 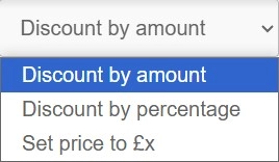 6\. Once you have selected the method of discount, you will need to enter the amount you wish to discount by, or the specific price you would like to set the product to. As we are discounting by a percentage in this example, I'm going to type "10" to apply a 10% discount.  7\. To apply the discount, an authorisation (Auth) pin will be required.Note: this will not be required if the total amount discounted (including promotions) is less than the percentage defined in Site Settings under 'Maximum discount without authorisation limit per order (percentage)'
 8\. If the Auth PIN was correct, the discount will be applied and you will receive a "Success" message. 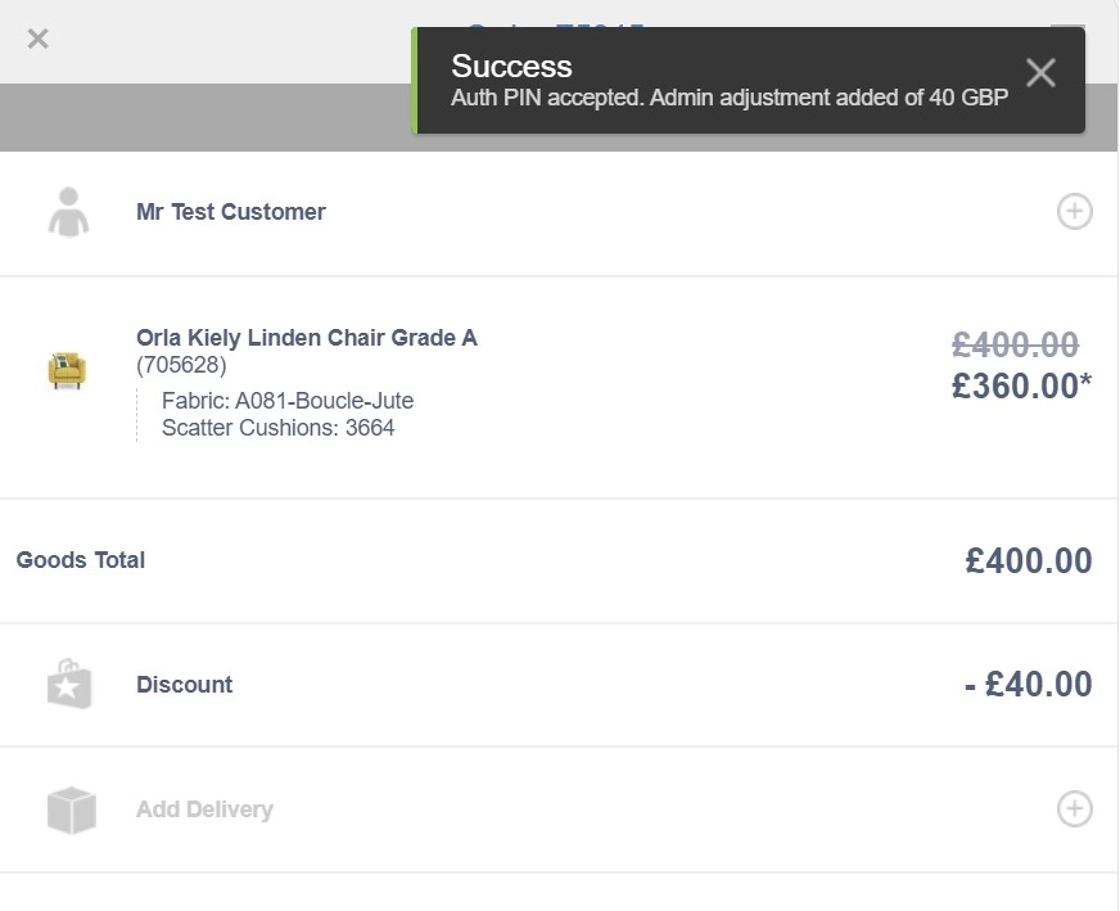 # Adding Delivery to a Sales Order in the EPoS 1\. Delivery can be added to an order by clicking "Add Delivery".  2\. From here you can select the appropriate delivery method. All available delivery methods (Postage Types) will be displayed.  3\. If the customer is not walking away with the product(s), and the product does not need to be ordered in, you can book the delivery.  4\. Clicking "Book Delivery" will open up a scheduler popup. In here you can select the appropriate products that you wish to book the delivery for, as well as the date, lorry and timeslot.For more detail, there is a separate page for [Scheduling a Sales Order](https://bookstack.iconography.co.uk/books/scheduling/page/how-to-schedule-a-sales-orderstock-transfer)
 5\. You can manually enter a delivery cost.  6\. However, you can also choose to "Auto-Recalculate" delivery, which will automatically calculate the delivery cost, depending on the delivery address and delivery method (postage type) chosen.  7\. You may wish to enter delivery instructions. For example, there may be tricky access which the delivery drivers need to know about.  8\. Once you're happy that the delivery information has been entered correctly, hit "Update".  9\. Delivery has now been applied to the order. 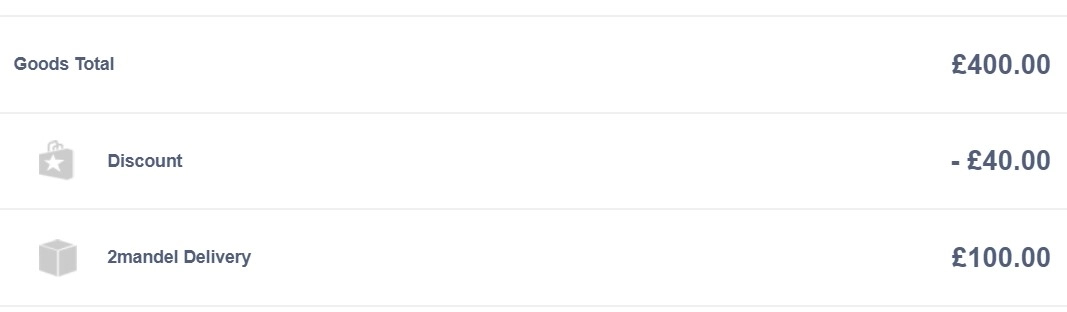 # Adding a Payment to a Sales Order in the EPoS # Removing VAT from a Sales Order Line in the POS Click or tap on the line that you wish to edit, then choose to Remove VAT. [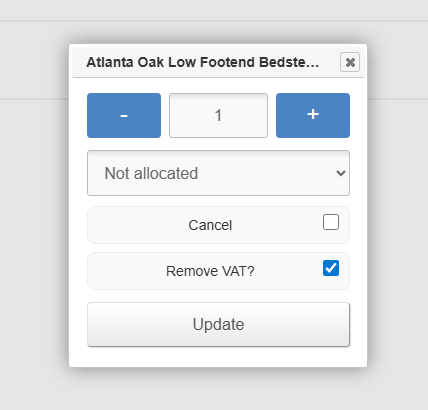](https://bookstack.iconography.co.uk/uploads/images/gallery/2025-09/dkQimage.png) It will be possible to add a [VAT Exemption Form](https://bookstack.iconography.co.uk/books/general/page/vat-exemption-form) further down the page.VAT Exemption reasons may be edited in [Site Settings](https://bookstack.iconography.co.uk/books/site-settings "Site Settings")
# Voucher Balance This screen can be used to do a quick lookup of a [Voucher](https://bookstack.iconography.co.uk/books/gift-vouchers "Gift Vouchers")'s value, on behalf of a [Customer](https://bookstack.iconography.co.uk/books/customers/chapter/account-types "Customers"). Enter or scan the barcode of a gift voucher into this box. [](https://bookstack.iconography.co.uk/uploads/images/gallery/2025-05/Y05image.png) This will display a value and an expiry date. [](https://bookstack.iconography.co.uk/uploads/images/gallery/2025-05/mtAimage.png) # Performance Report This screen can be used to review a User's performance. This report is a weekly performance report, benchmarked against the Weekly Sales Target set against each [User](https://bookstack.iconography.co.uk/books/update-users/page/user-management "User Management"). [](https://bookstack.iconography.co.uk/uploads/images/gallery/2025-05/5VPimage.png) # End of Day ### Tills A till is defined as a device which is connected to a Receipt Printer; all payments are linked first to Stores, and then to Receipt Printers if one is available. ### X Reads If a Superuser is logged into the CMS on a device that is connected to a till, it is possible to complete an X read. This will print a summary of all transactions and payments put through that till since the last End of Day (Z read) was completed. [](https://bookstack.iconography.co.uk/uploads/images/gallery/2025-08/er8image.png) ### Z Reads This is used to cash up a till at the end of the day or at the end of a shift. Because the cashing up process is timestamped, it is possible to cash up multiple times in a single day. When this is run, it will complete a Z Read for every payment either: - since 00:01 on that same day, or - if another Z Read has been completed on that day, it will process for all payments from that Z ReadData may be retroactively logged by using the drop down at the top of the screen.
Each payment type that was taken on that day will be displayed, along with a box to enter that day's takings. The User should enter the amount as counted, and that will be recorded.Integrated payment types, such as Elavon Retail Cloud, will not appear on this list, as they are automatically accounted for.
[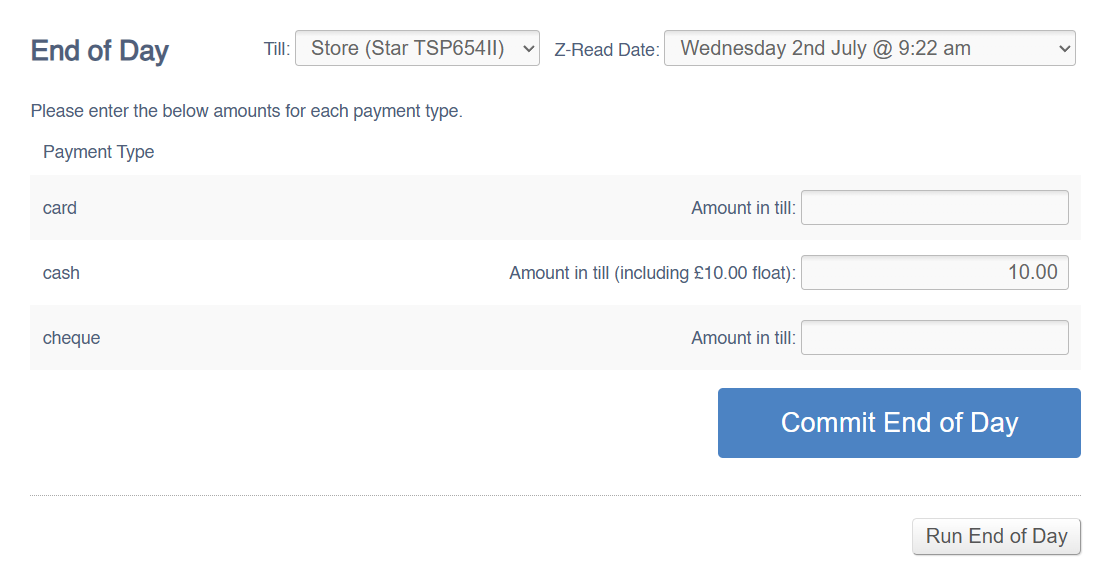](https://bookstack.iconography.co.uk/uploads/images/gallery/2025-08/J8Jimage.png) Each till must be cashed up independently; these will be based on linked receipt printers. it will also be possible to cash up 'back office', which covers all payments added from a Store that are not linked to a receipt printer. This will include all payments entered into the CMS.When payments are added, they are linked to a Store, based on the Store from which the CMS user is currently working. If necessary, the current Store can be amended on the Dashboard, but their default Store is controlled within their User in the CMS.
Submitted data can later be viewed on the [Till Discrepancies](https://bookstack.iconography.co.uk/books/payment-reports/page/till-discrepancies "Till Discrepancies") report. ### Discrepancies In the event of a discrepancy, a warning will be shown and the user will be given the option to review the data entered. [](https://bookstack.iconography.co.uk/uploads/images/gallery/2025-05/Wqdimage.png) # Additional Information Other utilities and minor function within the EPoS # Complete SaleThis button can affect Stock Levels, and users should be aware of this prior to use
If pressed, the Complete Sale button will: - mark all items on the order as despatched, regardless of stock availability - close the order - print a receipt (if a [Hardware Integration](https://bookstack.iconography.co.uk/books/hardware-device-setup/chapter/star-printers "Hardware") exists) [](https://bookstack.iconography.co.uk/uploads/images/gallery/2025-05/W6iimage.png) ### Criteria for Display The Complete Sale button will only display under certain criteria: - the item is a 'Collection' order, meaning that delivery has not been configured - the order is fully paid It will not show if: - an order is marked for delivery ### Warning If a user attempts to use the Complete Sale button, and not all items have available stock, a warning will be displayed. If the user presses 'Despatch Now', stock will be automatically created to fulfil the order.Improper use can cause stock levels to be artificially inflated
'Save for later' will cancel the process and close the pop up without completing the sale. [](https://bookstack.iconography.co.uk/uploads/images/gallery/2025-05/oUoimage.png) # Product Detail Page (POS) This screen shows esential information about the Product, in a similar way to the eCommerce Product Detail Page. [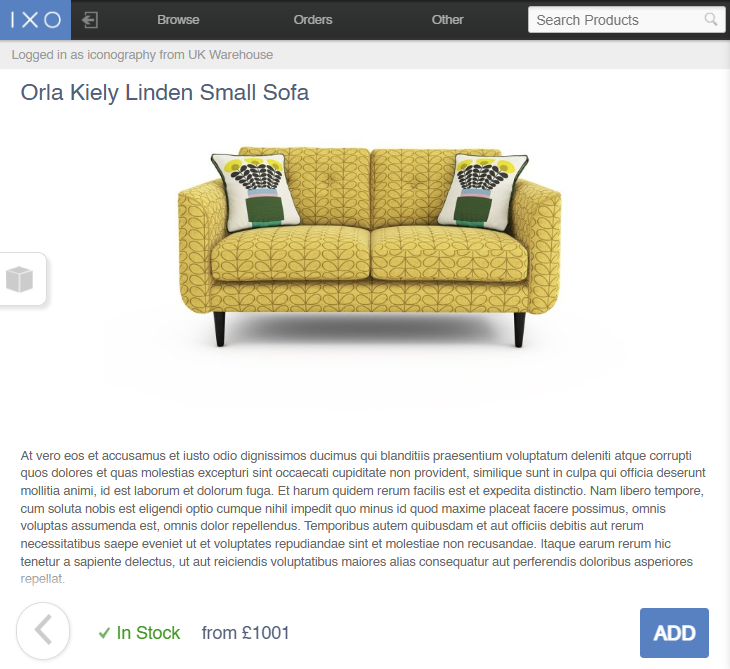](https://bookstack.iconography.co.uk/uploads/images/gallery/2026-03/image.png) ### Stock InformationStock information is shown by tapping/hovering on the box icon on the left hand side
#### On Order This will show a breakdown of all units On Order for that SKU. This will show the next delivery date of any unit (either allocated or unallocated), based on the confirmed delivery date per Purchase Order line. [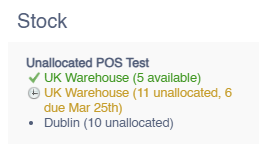](https://bookstack.iconography.co.uk/uploads/images/gallery/2026-03/qUuimage.png) #### USRs This will show a breakdown of all Unique Stock Records with stock, if they are also enabled for the POS. [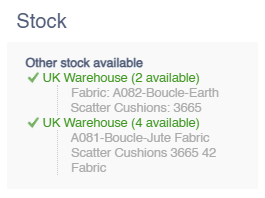](https://bookstack.iconography.co.uk/uploads/images/gallery/2026-03/hMsimage.png)