Swatches
Manage your Swatch book.
Swatch Groups
Swatches are used to add Customisation to individual Products. These will display to the customer on the website and in the POS, as well as when adding Purchase Orders and managing Sales Orders in the CMS.
This screen will display your Swatch Groups, as well as highlighting how many products are linked to those Swatch Groups.
Key to icons
![]() = edit swatch group
= edit swatch group
![]() = delete swatch group
= delete swatch group
![]() = view/add swatches within group
= view/add swatches within group
![]() = assign swatches to Products
= assign swatches to Products
Setup
You must setup a Swatch Group before you can create Swatches.
| Field | Purpose |
| Swatch Group name | This is used as a label for the Swatch Group |
| Associated Brand | This field is required when using the Assignment Screen |
| Request a Swatch | Enable this Swatch Group for the Request a Swatch feature |
Swatches
Swatches are used to add Customisation to individual Products. These will display to the customer on the website and in the POS, as well as when adding Purchase Orders and managing Sales Orders in the CMS.
These screens are how to manage individual Swatches and their assignment to Products.
Key to icons
![]() = edit swatch
= edit swatch
![]() = delete swatch
= delete swatch
Assignment and Deletion
Adding Swatches
This may be done by clicking the 'add swatch' button.
Swatches should be uploaded at 400 x 400 pixels
IXO Commerce will then store multiple versions of that image for use in different parts of the system and website
Assigning Swatches
Swatches may be assigned through the swatch assignment tool. This is accessed through the 'assign swatch' icon: ![]()
Swatches may also be assigned in bulk via CSV import, or via the Customisation tab on the edit product screen
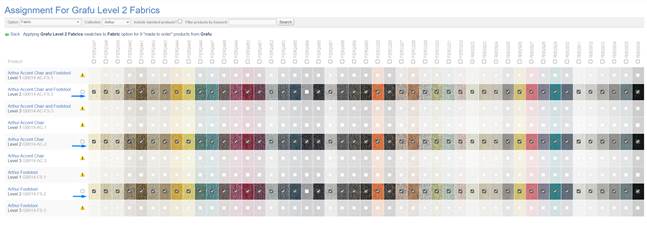
To assign swatches, you will need to select products, filter to variants, and confirm the option that is to be created. Each Swatch Group is already linked to a Brand; this will pre-filter the products, which can be further filtered by Collection.
It is also recommended to filter by keyword to highlight particular Variants, e.g. you are applying the 'Grade A' fabrics, so filter to the 'Grade A' variants.
Then use the tick boxes to apply the swatches. Please be aware that these changes are instant, and no manual save is required.
When Swatches are assigned to products, they will create Customisations
Removing Swatches (without deletion)
If you untick swatches against Variants within the swatch assignment tool, then that swatch (and corresponding option) will be removed as a customisation.
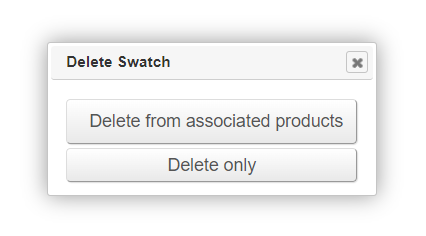
Deleting Swatches
When a Swatch is deleted, the user will be asked if it should be removed from all associated products.
If it is , it will be automatically removed from all linked products, along with the related Customisation. Variants will be unaffected.
If it is not removed, the Swatch will be deleted, but the related Customisation or Option Value will remain.
FAQs
Can I apply Swatches to Standard products, or do they need to be marked as 'Made to Order' first?
You don't need to change the product type; applying swatches to 'standard' products will convert them to 'made to order' products.
Why aren't my products showing up in the list?
Please ensure that the Product and the Swatch Group have been assigned to the same Brand.
At what size should I upload my Swatches?
All swatch images should be uploaded at 400px X 400px.
Swatch Assignment Tool
Normally, you’d have to open each collection and product individually to remove or add a swatch. This tool makes it faster: you just tick or untick swatches for products under a chosen collection in one place.
We recommend using the swatch assign tool for maintenance purposes, rather than creating products. For example:
- If I stop using a swatch, I’d untick it to remove it from the front end.
- If I start using that swatch again, I’d tick it to show it again.
Changes made will go live immediately, so you need to be careful about what you tick or untick. Accidentally selecting/deselecting a whole row or column could overwrite assignments, and you might not remember the previous setup.
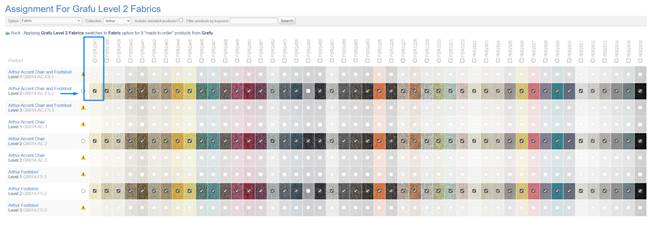
The swatch assignment tool allows you to assign in a swatch group, to the product variants of a specific collection. It also shows you the individual swatches that are assigned to the product variants of a specific collection, within that swatch group.
Please see the following guide below:
1. Open the swatch assign tool
Access the tool under ‘Swatches’. There is an ‘assign’ icon next to the swatch groups.

2. Select the collection and variant option you want to assign the swatch to
You are required to select an 'option' and a 'collection' (these are collections within the brand that the swatch group is associated to). Hitting search will return all product variants within the chosen collection that have the selected option applied to it (in this instance we have chosen fabric as the option).

3. Review current swatch assignments
Look at the table to see which swatches are currently ticked (assigned) and unticked (not assigned) for each product variant.
4. Make changes carefully
To remove a swatch: Untick the box next to that swatch for the relevant product(s).
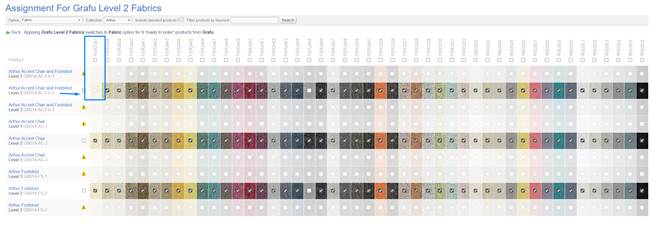
To add a swatch back: Tick the box again for the relevant product(s).
5. Double-check before closing/moving away
Since changes update immediately on the live site, review what you’ve ticked and unticked before moving on.

Avoid unticking/ticking an entire row unless you’re certain about the changes.
6. Restore mistakes (if needed)
If you untick the wrong swatch, tick it again—the tool updates live, so re-ticking will restore it.
If you lose track of what was originally assigned, compare against another product setup you trust, or refer to backup notes/screenshots if you made them.
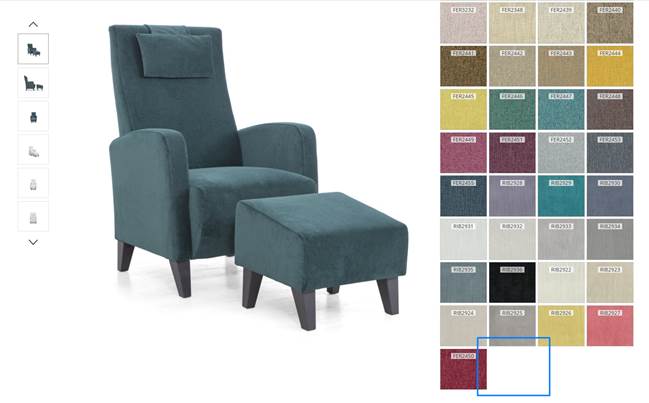
7. Verify on the front end
Check your website or storefront to ensure the swatches display (or disappear) as intended.
Quick Checklist to assist:
- Select the correct collection
- Note current swatch assignments (optional: take a screenshot as a backup).
- Make precise tick/untick changes.
- Review changes carefully before leaving the page.
- If a mistake happens, re-tick or untick as needed to correct it.
- Confirm updates on the live site.